iMovie Tutorial: How to Rotate a Video

On more than one occasion, I have been so excited to capture greatness on video, only to discover upon playback, that I have held my phone improperly and recorded an upside down or sideways video! This makes the video virtually useless for sharing ~ or so I thought, until figured out how to fix it. In case this has happened to any of you, or should it happen in your future, I thought I’d share an iMovie tutorial on how to rotate a video.

I have been able to do some basic editing to videos right on my phone within the iMovie App, however the option to crop or rotate does not exist that I have been able to find. Determined to fix my most recent upside down video, I uploaded it to my computer and imported it into iMovie there.
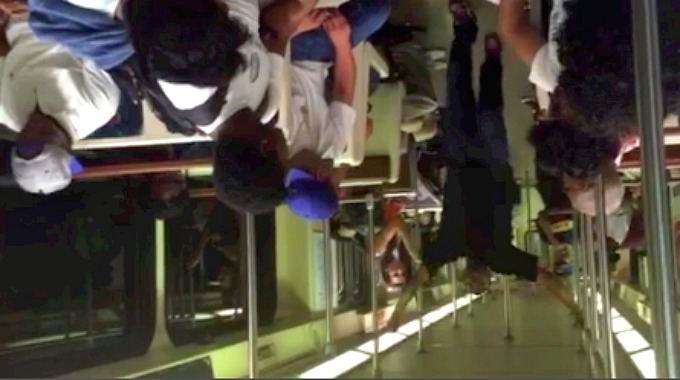
upside down video

As you can see, everyone on my subway ride is hanging from the ceiling. That would have been cool if this was an amusement park ride, but instead I had some editing to do. Here’s how I did it…
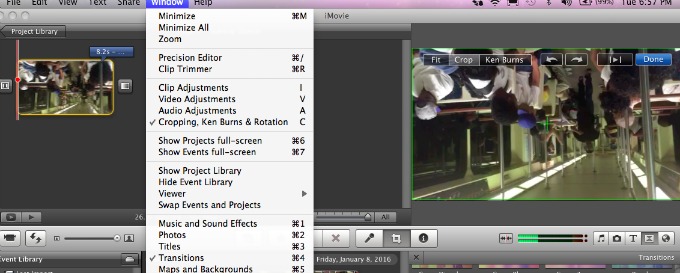
iMovie Tutorial

Once you have imported your video in iMovie and have started a new project with it, click on the clip you need to adjust and then from the window menu select Cropping, Ken Burns and Rotation.
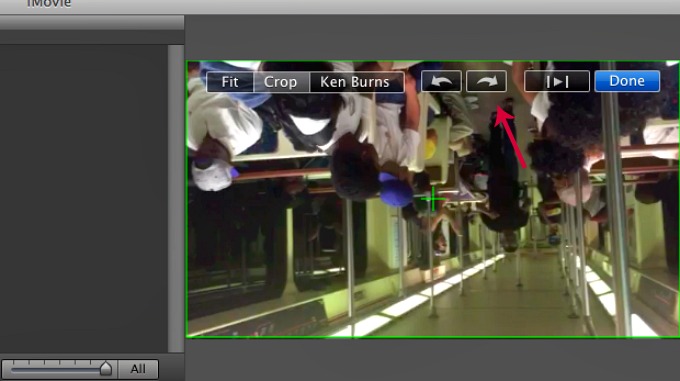
editing in iMovie

Click on the arrow icon in the direction you want your clip to flip. Each click will rotate your clip a 1/4 turn. Sometimes your video is sideways and not all the way upside down so the 1/4 turn option is great.

break dance on the subway

Voila! Now it is only the talented subway dancer I captured who is upside down. Once your video is right side up, simply select ‘Done’ and return to editing or finish your video.

I hope you have found this iMovie tutorial to be a welcome relief for those pesky times you simply hold your phone the wrong way and have an upside down world to deal with! Here is my edited video of a breakdance on the subway in its entirety for you to enjoy.

Tips for Creating Music Video Montages

When I was in high school, a friend and I got more than a little obsessed with making music videos. When I say this, I mean we’d mostly dress up and dance around lip-synching in front of her Macbook, recording ourselves into iMovie. Fast-forward a fews years later, and I’m a working musician, making my own music and starting to think about making some music videos. The first video I started is still being shot, but over the summer another friend and I had an idea to record and film an acoustic cover of a rap song, to serve as a fun contrast to my own music, which is decidedly more on the indie-folk end of the spectrum. Behold my cover of Nicki Minaj’s “Itty Bitty Piggy:” (Disclaimer: there are a few swear words in here. It’s a rap song. Maybe don’t play this when the kids are around…)

[youtube=http://www.youtube.com/watch?v=1LtWIHsk10E]

My friend Alison Mah and I figured out the concept for the video, and she filmed and edited the clip. She did such a great job of it that she inspired me to try my own hand at video-editing. Alyzee, my fellow Ahimsa Media intern, and I shot a whole bunch of footage with the intention of making a fun tribute video for our teen-friendly character, Shea. As this was a video ostensibly made by a teen with the target audience of other teens, and also because Shea is a fictional character, it was important not to show too much of my face in the footage. This was a challenge, but I think it actually added to the accessibility of the video in the end. Here is the video:

[youtube=http://www.youtube.com/watch?v=YD6-EZV_yt0]

This post is of necessity not going to be a step-by-step guide about how to manually edit videos, as there are myriad video-editing programs out there, and I am by no means an expert on any of them. However I did learn some things in the process that I wish someone had shared with me:

1) Getting timing exactly right the first time IS important. Little gaps, or strange transitions make for awkward interruptions in the video that really are noticeable. Make sure to be as exact as possible about transitions as you go through your footage. You really, really don’t want to go back and fix every transition. Believe me.

2) Play around, both in the shooting and editing process! Lots of my favourite moments in Shea’s video came about by chance or whim. I had actually finished editing the clips together before I discovered that I could play around with contrast and colour in iMovie. I then went through and played with each separate clip’s colour and contrast until I was happy with them. The colours are definitely my favourite part of the video, and give it a whimsical vibe.

3) If you are making a music video montage like we did, look for a song that matches what you want to say in the video, but try not to make it too literal. If the song mentions eagles, and you show a shot of an eagle flying, it might be a little too contrived. Try to be unobtrusively quirky and unexpected in your images, no matter the subject matter. Everyone appreciates a clever image/lyric/music match-up.

4) Make sure to name and tag your video appropriately. The most prevalent part of the name should be to credit the musician. For example, we called Shea’s video “Hannah Georgas – The Beat Stuff tribute,” after the artist and title of the song we made the montage around. The video is yours, but the music is the musician’s. Credit them!

5) Most of all, have fun. If you’re making a video-montage, what better time is there to play around with effects, timing, and images? With modern technology, everyone can be a passable film-maker and graphics editor. Take advantage of it! Explore as you go! Video-editing can be a time consuming process, but it doesn’t have to have to be painful. And in the end, you have a guaranteed crowd-impressing product. (Lots of people don’t realise how easy it is to edit videos…)