In July my knowledge of personalizing YouTube Channel pages went up by about 100 percent. Erica assigned Liz and I the task of creating and personalizing YT Channels for Ahimsa characters Shawnee and Shawn Rockett (of the Shaw Rocket Fund), and for Shea, Ahimsa’s teenage character online.
I’d never tried my hand with personalizing YT Channels before and thought it should be easy, just like personalizing one’s desktop background. To my surprise, I found that just learning the ropes of YT Channel personalization takes a significant amount of time and experimentation. After spending many an ungainly hour on the project I thought I must just be YouTube-challenged, and so sought Liz’s help to speed things along. I was relieved to find that Liz – talented as she is with manipulating digital photos – uttered as many expletives as I did while we worked on getting the YT background image just right. Erica calmed us both by assuring us that personalizing the web page takes much longer than you’d think it would, and that after it’s completed, things move much more smoothly. (They do. And it’s such a pleasure to admire the finished product in the end).
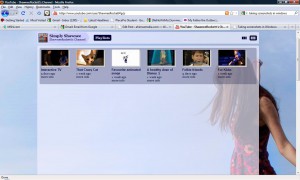
I always admire the colours on Shawnee Rockett’s YouTube channel
So to save all of you some time when personalizing your own YT Channels, here are some good-to-know tips:
1.There is no real ideal size for a YT background image, so don’t bother Googling it to see what size picture other YT users are using. This is because as you add more material to the Channel, the page will grow longer but your image will not. You can cope with this setback by choosing a background colour that will soften the line where the text exceeds the picture. The width that Liz and I found worked best for her photos was 1300 pixels.
We chose a deep grey background to blend in with Shawn Rockett’s teal and deep blue channel colours.
2. Depending on the size of the computer screen being used, the sides of the image displayed may be cut off. So while the edges of the image may show up on your screen, they may be lost on smaller monitors. For this reason, don’t pick images that have a lot of the subject on the extreme edges of the screen as they might become invisible to other viewers.
3. This restriction poses the problem of having a very small margin in which to display your subject on the Channel page. Pushing the subject too far towards the centre of the page will make the image disappear behind the wrapper, and moving it too far towards the edges is risky as well (see tip 2). You can increase how much of the background image is visible by making the wrapper totally or partially transparent. Do this by clicking “advanced options” under the Themes and Colours tab and adjusting the “Wrapper Transparency” option with the drop-down menu given.
We made the outer wrapper 100% transparent and the inner wrapper 40% transparent so that more of the background picture would appear.
4. When you’re picking the colours to go in the fields in “advanced options”, you need not be limited to the 56 colours offered in the YT grid. There are 216 html colour codes you can find online. Enter the codes for the colours you like in the grids to give yourself more freedom when designing your page. Name and save the combination of colours you decide on in the top left field of “advanced options” so that you can apply this palette with a single click on other YT Channels you might personalize.
5. Now comes the easy part. When you’re done with setting up the background and visuals, you can start favouriting videos, creating playlists and putting in a channel description. To display your playlists, you need to click the “Videos and Playlists” tab and select which playlists you want displayed. You have to do this every time you create a new playlist and want it on your channel page.
Under the “Videos and Playlists” tab, click on “Playlists” and then “Arrange Playlists” to decide what order you want your playlists shown in.
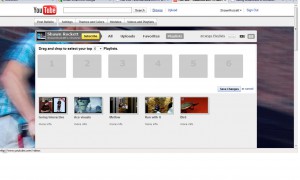
You can click “Arrange Playlists” to edit the order of your YT playlists
You can also edit your playlists and arrange the order of individual videos by clicking on one of the playlist icons and then clicking “edit my playlist” (this last one took me a while to figure out).
I hope these nitty gritties are useful to any enterprising YT users out there. Good luck creating your personalized YouTube Channel page!


Thanks for the posting. Very helpful and timely for us.
Thanks Kelly, Erica tells me you’re really creative with the camera! I’m so glad this post was useful to you.
Thanks Cornelia, it was a product of lots of trial and error. Hope it was helpful!